[root@localhost ~]# uname -r3.10.0-1160.71.1.el7.x86_64[root@localhost ~]#[root@localhost ~]# cat /proc/versionLinux version 3.10.0-1160.71.1.el7.x86_64 (mockbuild@kbuilder.bsys.centos.org)(gcc version 4.8.5 20150623(Red Hat 4.8.5-44)(GCC))#1 SMP Tue Jun 28 15:37:28 UTC 2022
查看操作系统:
[root@localhost ~]# cat /etc/*releaseCentOS Linux release 7.9.2009 (Core)NAME="CentOS Linux"VERSION="7 (Core)"ID="centos"ID_LIKE="rhel fedora"VERSION_ID="7"PRETTY_NAME="CentOS Linux 7 (Core)"ANSI_COLOR="0;31"CPE_NAME="cpe:/o:centos:centos:7"HOME_URL="https://www.centos.org/"BUG_REPORT_URL="https://bugs.centos.org/"CENTOS_MANTISBT_PROJECT="CentOS-7"CENTOS_MANTISBT_PROJECT_VERSION="7"REDHAT_SUPPORT_PRODUCT="centos"REDHAT_SUPPORT_PRODUCT_VERSION="7"CentOS Linux release 7.9.2009 (Core)CentOS Linux release 7.9.2009 (Core)[root@localhost ~]#
# 每个主节点在docker-compose.yml所在目录执行 docker-compose ps测试[root@k8s-master01 docker-compose]# docker-compose psNAME IMAGE COMMAND SERVICE CREATED STATUS PORTSnginx nginx:latest "/docker-entrypoint.…"nginx 13minutes ago Up 13minutes 0.0.0.0:80->80/tcp, :::80->80/tcp, 0.0.0.0:443->443/tcp, :::443->443/tcp[root@k8s-master01 docker-compose]#
# vi /usr/lib/systemd/system/cri-docker.service# 修改--pod-infra-container-image=registry.k8s.io/pause:3.9 为--pod-infra-container-image=192.168.115.11:81/pause:3.9# 重启cri-dockersystemctl daemon-reloadsystemctl restart cri-docker
14.6、完整配置如下:
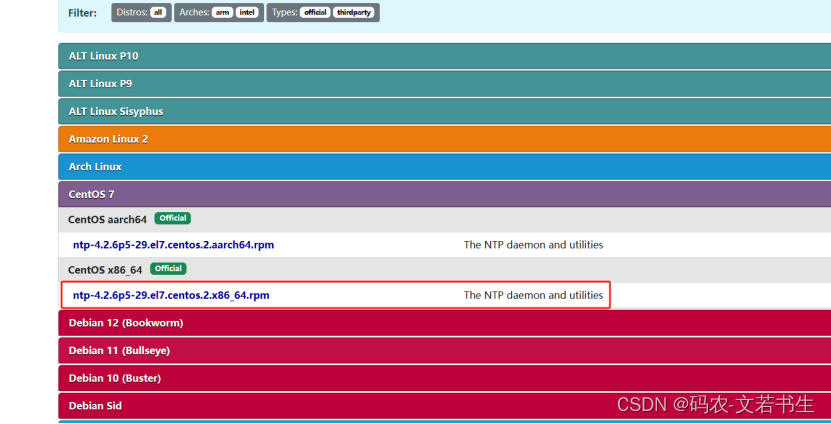
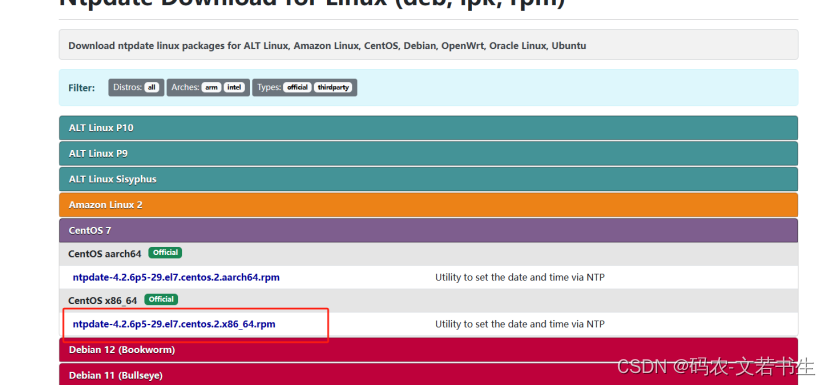
# For more information about this file, see the man pages# ntp.conf(5), ntp_acc(5), ntp_auth(5), ntp_clock(5), ntp_misc(5), ntp_mon(5).driftfile /var/lib/ntp/drift# Permit time synchronization with our time source, but do not# permit the source to query or modify the service on this system.restrict default nomodify notrap nopeer noquery# Permit all access over the loopback interface. This could# be tightened as well, but to do so would effect some of# the administrative functions.restrict 127.0.0.1restrict ::1# Hosts on local network are less restricted.# 允许内网其他机器同步时间,如果不添加该约束默认允许所有IP访问本机同步服务#restrict 192.168.1.0 mask 255.255.255.0 nomodify notraprestrict 192.168.115.0 mask 255.255.255.0 nomodify notrap# Use public servers from the pool.ntp.org project.# Please consider joining the pool (http://www.pool.ntp.org/join.html).#server 0.centos.pool.ntp.org iburst#server 1.centos.pool.ntp.org iburst#server 2.centos.pool.ntp.org iburst#server 3.centos.pool.ntp.org iburst# 配置和上游标准时间同步server 210.72.145.44 # 中国国家授时中心server 133.100.11.8 #日本[福冈大学]server 0.cn.pool.ntp.orgserver 1.cn.pool.ntp.orgserver 2.cn.pool.ntp.orgserver 3.cn.pool.ntp.org# 配置允许上游时间服务器主动修改本机(内网ntp Server)的时间restrict 210.72.145.44 nomodify notrap noqueryrestrict 133.100.11.8 nomodify notrap noqueryrestrict 0.cn.pool.ntp.org nomodify notrap noqueryrestrict 1.cn.pool.ntp.org nomodify notrap noqueryrestrict 2.cn.pool.ntp.org nomodify notrap noqueryrestrict 3.cn.pool.ntp.org nomodify notrap noquery# 确保localhost有足够权限,使用没有任何限制关键词的语法。下载NTP
[root@k8s-master01 calico]# kubectl get nodeNAME STATUS ROLES AGE VERSIONk8s-master01 Ready control-plane 106m v1.30.0k8s-master02 Ready control-plane 99m v1.30.0k8s-master03 Ready control-plane 90m v1.30.0k8s-node01 Ready <none>82m v1.30.0k8s-node02 Ready <none>82m v1.30.0[root@k8s-master01 calico]#
安装docker-ce/containerd.io
11.1.1、#server 127.127.1.0#fudge 127.127.1.0 stratum 10#broadcast 192.168.1.255 autokey # broadcast server#broadcastclient # broadcast client#broadcast 224.0.1.1 autokey # multicast server#multicastclient 224.0.1.1 # multicast client#manycastserver 239.255.254.254 # manycast server#manycastclient 239.255.254.254 autokey # manycast client# Enable public key cryptography.#cryptoincludefile /etc/ntp/crypto/pw# Key file containing the keys and key identifiers used when operating# with symmetric key cryptography.keys /etc/ntp/keys# Specify the key identifiers which are trusted.#trustedkey 4 8 42# Specify the key identifier to use with the ntpdc utility.#requestkey 8# Specify the key identifier to use with the ntpq utility.#controlkey 8# Enable writing of statistics records.#statistics clockstats cryptostats loopstats peerstats# Disable the monitoring facility to prevent amplification attacks using ntpdc# monlist command when default restrict does not include the noquery flag. See# CVE-2013-5211 for more details.# Note: Monitoring will not be disabled with the limited restriction flag.disable monitor
重启ntp
systemctl restart ntpd
查看ntp服务状态
[root@localhost ntp]# systemctl status ntpd● ntpd.service - Network Time Service Loaded: loaded (/usr/lib/systemd/system/ntpd.service;enabled;vendor preset: disabled)Active: active (running)since 一 2024-04-08 21:36:18 CST;3min 42s ago Process: 9129ExecStart=/usr/sbin/ntpd -untp:ntp $OPTIONS(code=exited, status=0/SUCCESS)Main PID: 9130(ntpd)CGroup: /system.slice/ntpd.service └─9130 /usr/sbin/ntpd -untp:ntp -g4月 08 21:36:18 k8s-master02 ntpd[9130]: Listen and drop on 0v4wildcard 0.0.0.0 UDP 1234月 08 21:36:18 k8s-master02 ntpd[9130]: Listen and drop on 1v6wildcard :: UDP 1234月 08 21:36:18 k8s-master02 ntpd[9130]: Listen normally on 2lo 127.0.0.1 UDP 1234月 08 21:36:18 k8s-master02 ntpd[9130]: Listen normally on 3ens33 192.168.115.12 UDP 1234月 08 21:36:18 k8s-master02 ntpd[9130]: Listen normally on 4ens33 fe80::20c:29ff:febe:19d4 UDP 1234月 08 21:36:18 k8s-master02 ntpd[9130]: Listen normally on 5lo ::1 UDP 1234月 08 21:36:18 k8s-master02 ntpd[9130]: Listening on routing socket on fd #22 for interface updates4月 08 21:36:18 k8s-master02 ntpd[9130]: 0.0.0.0 c016 06 restart4月 08 21:36:18 k8s-master02 ntpd[9130]: 0.0.0.0 c012 02 freq_set kernel 0.000PPM4月 08 21:36:18 k8s-master02 ntpd[9130]: 0.0.0.0 c011 01 freq_not_set[root@localhost ntp]#
查看ntp服务器有无和上层ntp连通
[root@localhost ntp]# ntpstatunsynchronised timeserver re-starting polling server every 8s[root@localhost ntp]#
查看ntp服务器和上层ntp的状态
[root@localhost ntp]# ntpq -premote refid st t when poll reach delay offset jitter=============================================================================k8s-master01 .INIT. 16u 326400.0000.0000.000[root@localhost ntp]#
# For more information about this file, see the man pages# ntp.conf(5), ntp_acc(5), ntp_auth(5), ntp_clock(5), ntp_misc(5), ntp_mon(5).driftfile /var/lib/ntp/drift# Permit time synchronization with our time source, but do not# permit the source to query or modify the service on this system.restrict default nomodify notrap nopeer noquery# Permit all access over the loopback interface. This could# be tightened as well, but to do so would effect some of# the administrative functions.restrict 127.0.0.1restrict ::1# Hosts on local network are less restricted.#restrict 192.168.1.0 mask 255.255.255.0 nomodify notrap# Use public servers from the pool.ntp.org project.# Please consider joining the pool (http://www.pool.ntp.org/join.html).#server 0.centos.pool.ntp.org iburst#server 1.centos.pool.ntp.org iburst#server 2.centos.pool.ntp.org iburst#server 3.centos.pool.ntp.org iburst#配置上游时间服务器为本地的ntpd Server服务器server 192.168.115.11 iburst# 配置允许上游时间服务器主动修改本机的时间restrict 192.168.115.11 nomodify notrap noquery#下面这个配置,建议NTP Client关闭,建议NTP Server打开。 cri-dockerd 适配器允许通过 容器运行时接口(Container Runtime Interface,CRI) 来使用 Docker Engine。安装cri-dockerd
11.2.1、下载K8S运行依赖的镜像
14.5、# 注意:这里不能改,必须使用127.127.1.0,否则会导致无法#在ntp客户端运行ntpdate serverIP,出现no server suitable for synchronization found的错误。从节点配置
#查看可安装的版本,选择合适的版本,这里选择1.30.0-150500.1.1yum list kubeadm.x86_64 --showduplicates|sort-ryum list kubelet.x86_64 --showduplicates|sort-ryum list kubectl.x86_64 --showduplicates|sort-r# yum下载(不安装)yum -yinstall--downloadonly--downloaddir=/opt/software/k8s-package kubeadm-1.30.0-150500.1.1 kubelet-1.30.0-150500.1.1 kubectl-1.30.0-150500.1.1
9、server 127.127.1.0 iburstfudge 127.127.1.0 stratum 10#broadcast 192.168.1.255 autokey # broadcast server#broadcastclient # broadcast client#broadcast 224.0.1.1 autokey # multicast server#multicastclient 224.0.1.1 # multicast client#manycastserver 239.255.254.254 # manycast server#manycastclient 239.255.254.254 autokey # manycast client# Enable public key cryptography.#cryptoincludefile /etc/ntp/crypto/pw# Key file containing the keys and key identifiers used when operating# with symmetric key cryptography.keys /etc/ntp/keys# Specify the key identifiers which are trusted.#trustedkey 4 8 42# Specify the key identifier to use with the ntpdc utility.#requestkey 8# Specify the key identifier to use with the ntpq utility.#controlkey 8# Enable writing of statistics records.#statistics clockstats cryptostats loopstats peerstats# Disable the monitoring facility to prevent amplification attacks using ntpdc# monlist command when default restrict does not include the noquery flag. See# CVE-2013-5211 for more details.# Note: Monitoring will not be disabled with the limited restriction flag.disable monitor
重启ntp
systemctl restart ntpd
5.4.2、配置ssh免密登录
在一台机器上创建:
[root@k8s-master01 ~]# ssh-keygenGenerating public/private rsa key pair.# 回车Enter fileinwhichto save the key (/root/.ssh/id_rsa):Created directory '/root/.ssh'.# 回车Enter passphrase (empty forno passphrase):# 回车Enter same passphrase again:Your identification has been saved in/root/.ssh/id_rsa.Your public key has been saved in/root/.ssh/id_rsa.pub.The key fingerprint is:SHA256:wljf8M0hYRw4byXHnwgQpZcVCGA8R0+FmzXfHYpSzE8 root@k8s-master01The key's randomart image is:+---[RSA 2048]----+|.oo=BO*+. ||.o +=*B*E .||.ooo*O==.oo||+ .*==.++ o||.o S.+ o ||.|||||||+----[SHA256]-----+[root@k8s-master01 ~]#
复制id_rsa.pub
[root@k8s-master01 ~]# cd /root/.ssh[root@k8s-master01 .ssh]# lsid_rsa id_rsa.pub
[root@k8s-node01 ~]# ssh root@192.168.115.11The authenticity of host'192.168.115.11 (192.168.115.11)'can't be established.ECDSA key fingerprint is SHA256:DmSlU9aS8ikfAB9IHc6N7HMY/X/Z4qc6QGA0/TrhRo8.ECDSA key fingerprint is MD5:6d:08:b2:e4:18:d0:78:eb:9a:92:2b:1e:4d:a4:e6:28.Are you sure you want to continue connecting (yes/no)? yesWarning: Permanently added '192.168.115.11' (ECDSA)to the list of known hosts.Last login: Mon Apr 822:42:08 2024from k8s-master03[root@k8s-master01 ~]# exit登出
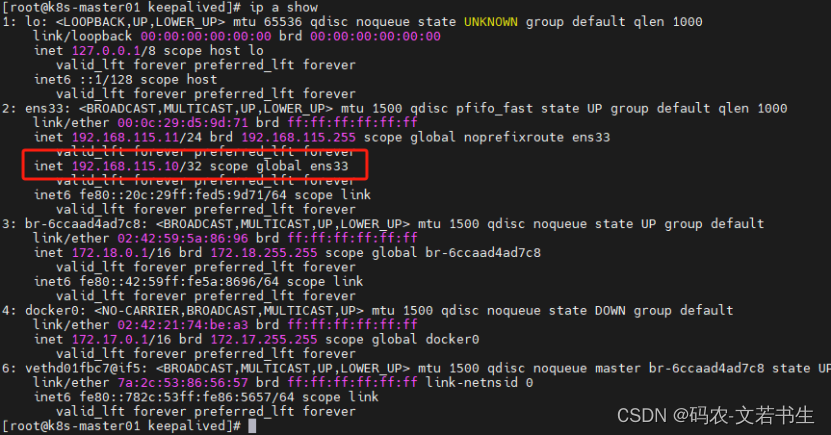
Your Kubernetes control-plane has initialized successfully!To start using your cluster, you need to run the following as a regular user: mkdir-p$HOME/.kube sudocp-i/etc/kubernetes/admin.conf $HOME/.kube/config sudochown$(id-u):$(id-g)$HOME/.kube/configAlternatively, ifyou are the root user, you can run: exportKUBECONFIG=/etc/kubernetes/admin.confYou should now deploy a pod network to the cluster.Run "kubectl apply -f [podnetwork].yaml"with one of the options listed at: https://kubernetes.io/docs/concepts/cluster-administration/addons/You can now joinany number of the control-plane noderunning the following commandon each as root: kubeadm join192.168.115.10:16443 --tokenabcdef.0123456789abcdef \--discovery-token-ca-cert-hash sha256:3c85f66540e67437ba4db122a736ba3aafb53443961be2605fbc0f9900196ef0 \--control-plane --certificate-key 3e9843a94c319853455ff67515b84345066363395622438f8a06d10ca75b81b8Please note that the certificate-key gives access to cluster sensitive data, keep it secret!As a safeguard, uploaded-certs will be deleted intwo hours;If necessary, you can use"kubeadm init phase upload-certs --upload-certs"to reload certs afterward.Then you can joinany number of worker nodes by running the following on each as root:kubeadm join192.168.115.10:16443 --tokenabcdef.0123456789abcdef \--discovery-token-ca-cert-hash sha256:3c85f66540e67437ba4db122a736ba3aafb53443961be2605fbc0f9900196ef0
其中两处join拷贝出来待用。在其中一个主节点通过命令查看节点情况
[root@k8s-master01 kubeadm-config]# kubectl get nodeNAME STATUS ROLES AGE VERSIONk8s-master01 NotReady control-plane 34m v1.30.0k8s-master02 NotReady control-plane 27m v1.30.0k8s-master03 NotReady control-plane 18m v1.30.0k8s-node01 NotReady <none>10m v1.30.0k8s-node02 NotReady <none>10m v1.30.0[root@k8s-master01 kubeadm-config]#