发布时间:2025-06-24 17:34:53 作者:北方职教升学中心 阅读量:588
如果您想要更多的控制权来处理错误,可以将其设置为 MessageHandlerErrorBehavior.NACK,然后手动决定是否重新排队或丢弃该消息。
这里没有指定
LANG=C.UTF-8,是因为RabbitMQ容器默认就是这个语言环境,无需我们再设定。 headers: 头交换机,根据消息的头部信息将消息发送到一个或多个绑定的队列。 rejectUnauthorized: 一个布尔值,表示是否拒绝不受信任的 SSL 证书。当设置为 true 时, * 生产者将使用 replyTo 和 correlationId 字段指定的队列和标识符来接收响应, * 而不是使用默认生成的匿名队列。 heartbeatIntervalInSeconds: 一个数字,表示心跳间隔时间(以秒为单位)。 */ type: 'direct', // 其他选项 // 持久化(Durable): 指定交换机、 prefetchCount: 300, /** 用于配置 RabbitMQ 消费者订阅的默认错误处理行为选项。默认为 true。您可以根据需要进行调整 */ connectionInitOptions: { wait: false }, /** * 用于启用直接回复模式。队列或消息是否需要在服务器重启后保留 options: { durable: false }, }, ], // 连接的url uri: 'amqp://admin:admin@localhost:5672', /** * 用于配置 RabbitMQ 连接的选项。 当消费者处理消息时出现错误时,可以使用该选项来指定消费者应如何处理这些错误。routingkey的关系理解 RabbitMQ Exchange - 知乎 原文
https://www.cnblogs.com/makalochen/p/17378002.html 转载
总之:
从 AMQP 协议可以看出,Queue、默认为 10000 毫秒。它是一个对象,可以包含以下属性: wait: 一个布尔值,表示是否等待连接成功后才开始启动应用程序。
- Exchange:消息交换机,它指定消息按什么规则,路由到哪个队列。
- Binding:绑定,它的作用就是把 Exchange 和 Queue 按照路由规则绑定起来。
Consumer:消息消费者,即接受消息的程序。默认为 true。
amqb api 文档
amqplib | Channel API reference
只有看了官方文档才能更正确的使用
NesJs 使用 mq 文档
https://docs.nestjs.cn/9/microservices?id=rabbitmq
日志依赖
https://www.npmjs.com/package/winston
GitHub - winstonjs/winston: A logger for just about everything.
GitHub - gremo/nest-winston: A Nest module wrapper form winston logger
https://docs.nestjs.cn/9/techniques?id=日志
https://juejin.cn/post/7187910528918880311
npm install --save nest-winston winston winston-daily-rotate-fileNestJs 中使用
安装依赖包
npm i --save amqplib amqp-connection-manager @nestjs/microservices上面三个包基础包,这里还有方便的包
nestjs/packages/rabbitmq/README.md at master · golevelup/nestjs · GitHub
所以完整的安装依赖应该为
npm i --save amqplib amqp-connection-manager @nestjs/microservices @golevelup/nestjs-rabbitmq创建 发布消息模块
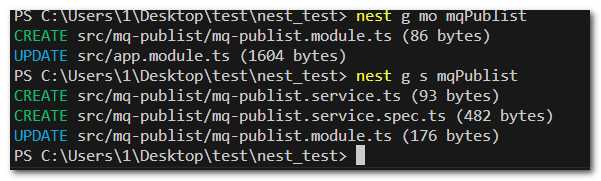
nest g mo mqPublistnest g s mqPublist
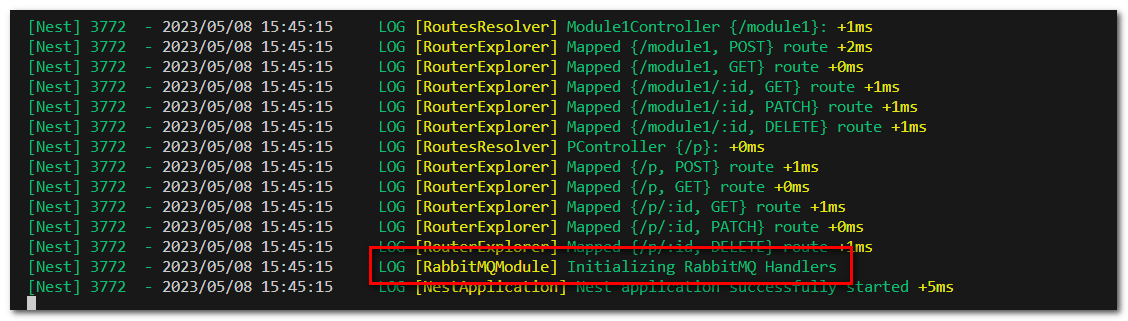
这样使用cli 工具就自动给我们 将 service 和 module 关联起来了,并在 全局模块中注册了
连接RabbitMQ
在写其他代码之前我们首先要保证,连接正常
全局注册模块
首先保证我们的
MqPublistModule模块在全局注册app.module.ts
import { MiddlewareConsumer, Module } from '@nestjs/common';import { AppController } from './app.controller';import { AppService } from './app.service';import { CatsController } from './cats/cats.controller';import { MakaloModule } from './makalo/makalo.module';import { UploadModule } from './upload/upload.module';import { UserModule } from './user/user.module';import { Module1Module } from './module1/module1.module';import { ConfigModule } from './config/config.module';import { PModule } from './p/p.module';import { MqPublistModule } from './mq-publist/mq-publist.module';// 日志模块import { WinstonModule } from 'nest-winston';import * as winston from 'winston';import 'winston-daily-rotate-file';@Module({ imports: [MakaloModule, UploadModule, UserModule, Module1Module, ConfigModule.forRoot({ path: '/makalo' }), PModule, MqPublistModule, // 日志模块 WinstonModule.forRoot({ transports: [ new winston.transports.DailyRotateFile({ dirname: `logs`, // 日志保存的目录 filename: '%DATE%.log', // 日志名称,占位符 %DATE% 取值为 datePattern 值。RoutingKey 的意义依赖于交换机的类型。 heartbeatIntervalInSeconds: 一个数字,表示心跳间隔时间(以秒为单位)。它是一个对象,可以包含以下属性: wait: 一个布尔值,表示是否等待连接成功后才开始启动应用程序。
Binding 表示 Exchange 与 Queue 之间的关系,
我们也可以简单的认为队列对该交换机上的消息感兴趣,
绑定可以附带一个额外的参数 RoutingKey。 */ type: 'direct', // 其他选项 // 持久化(Durable): 指定交换机、
Exchange 就是根据这个 RoutingKey 和当前 Exchange 所有绑定的 Binding 做匹配,
如果满足匹配,就往 Exchange 所绑定的 Queue 发送消息,
这样就解决了我们向 RabbitMQ 发送一次消息,可以分发到不同的 Queue。
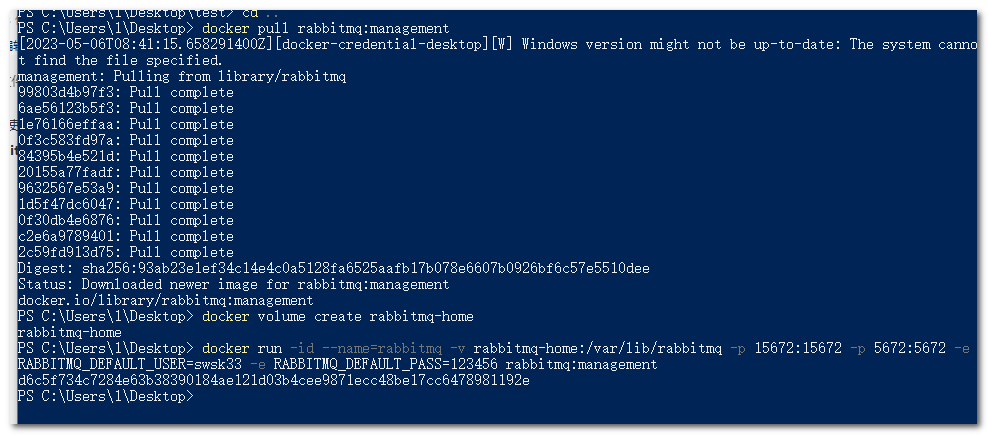
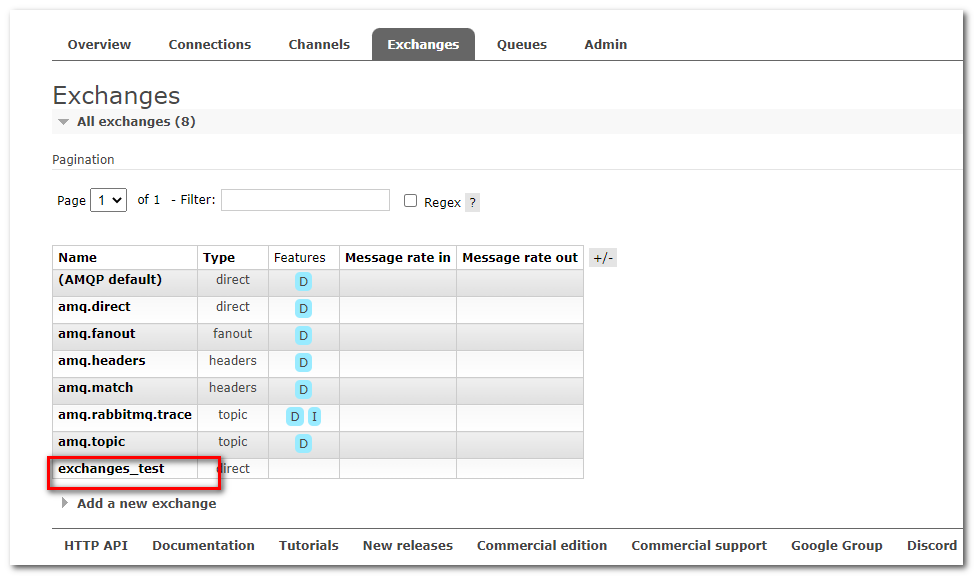
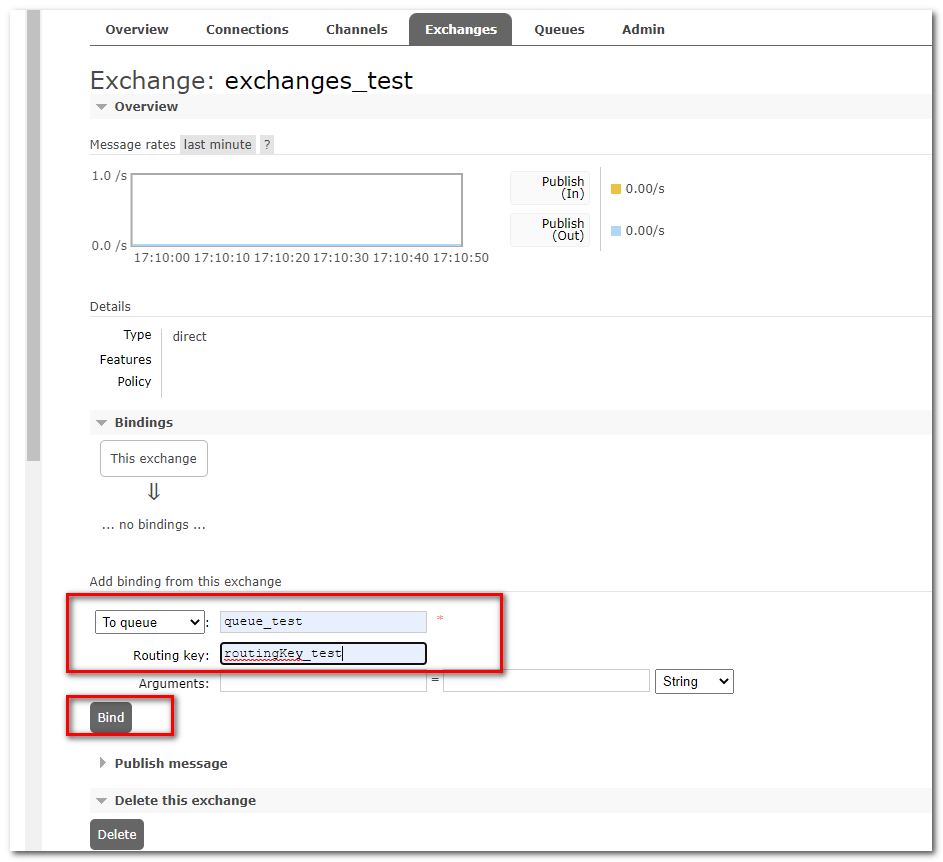
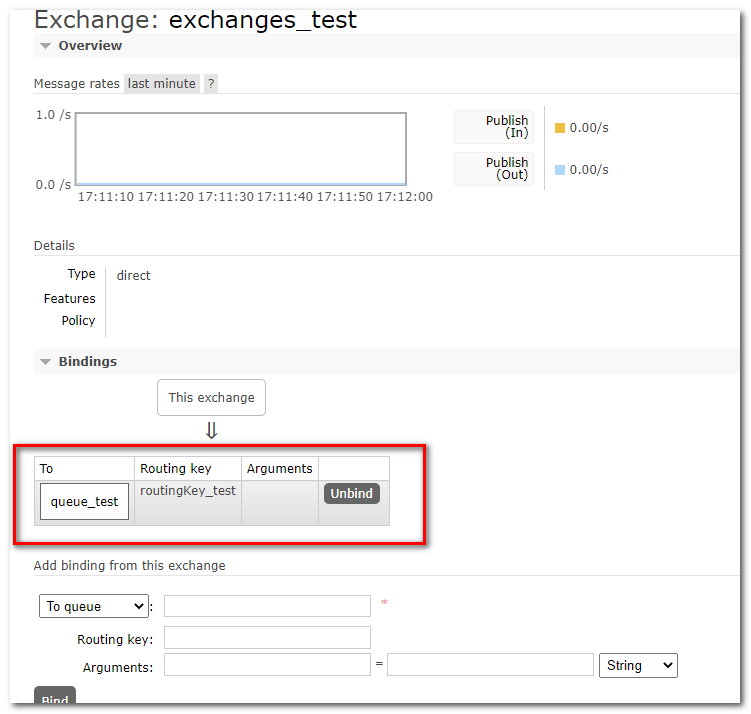
访问管理页面
http://localhost:15672/用户名:admin密码:admin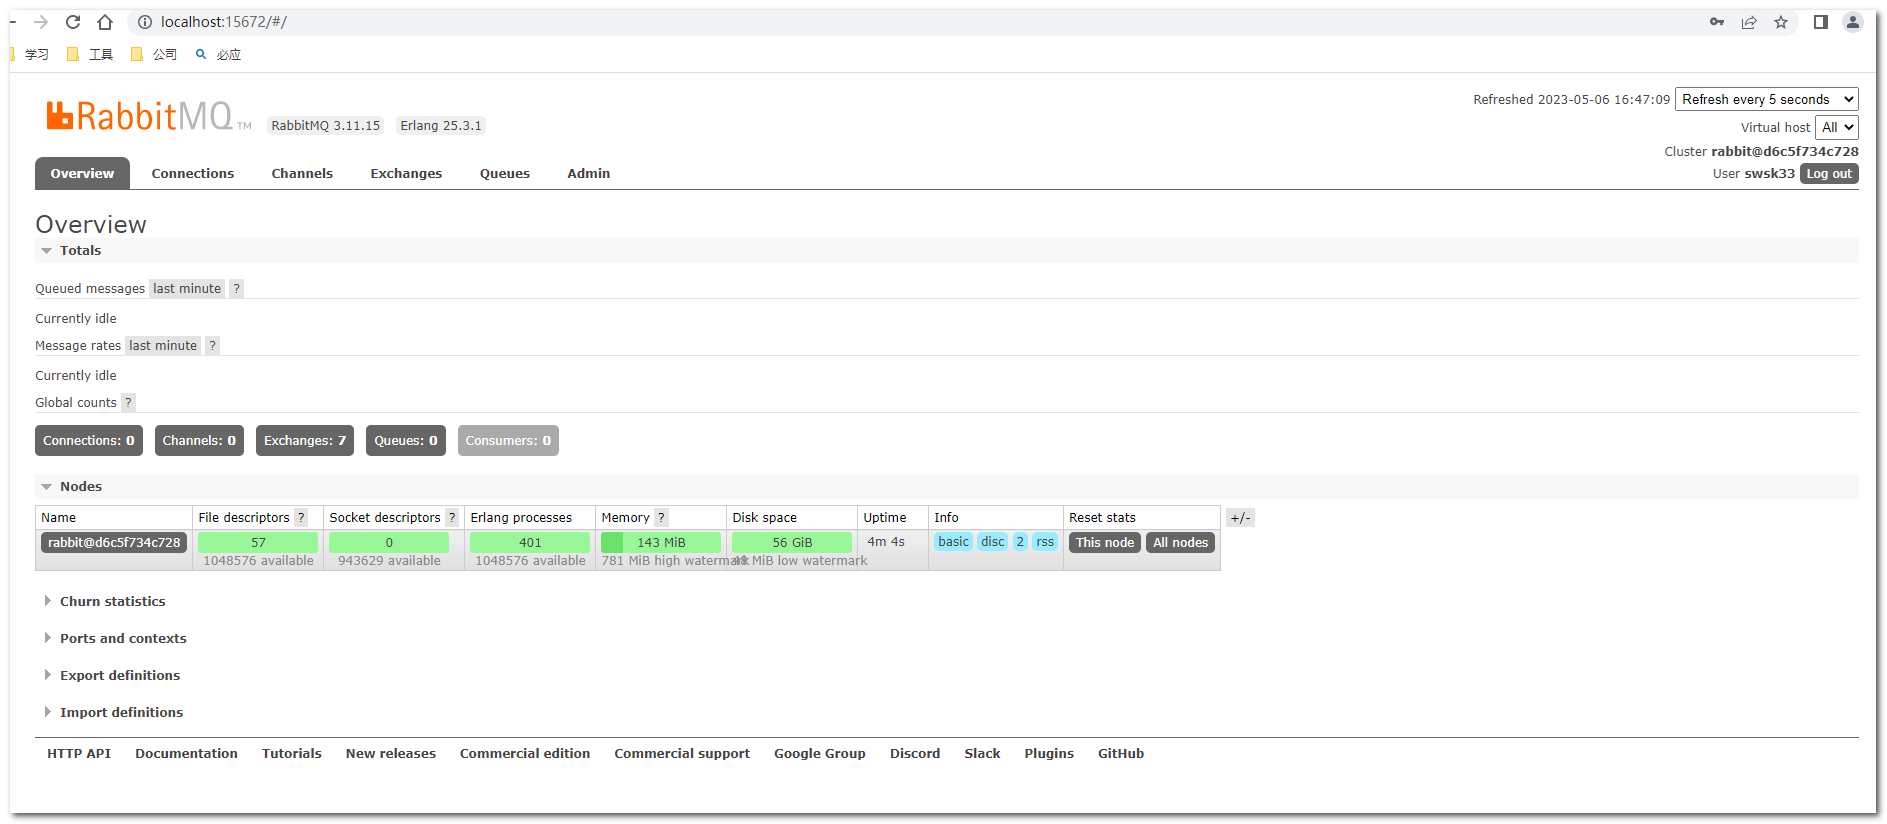
可以看到已经进去了
前置知识
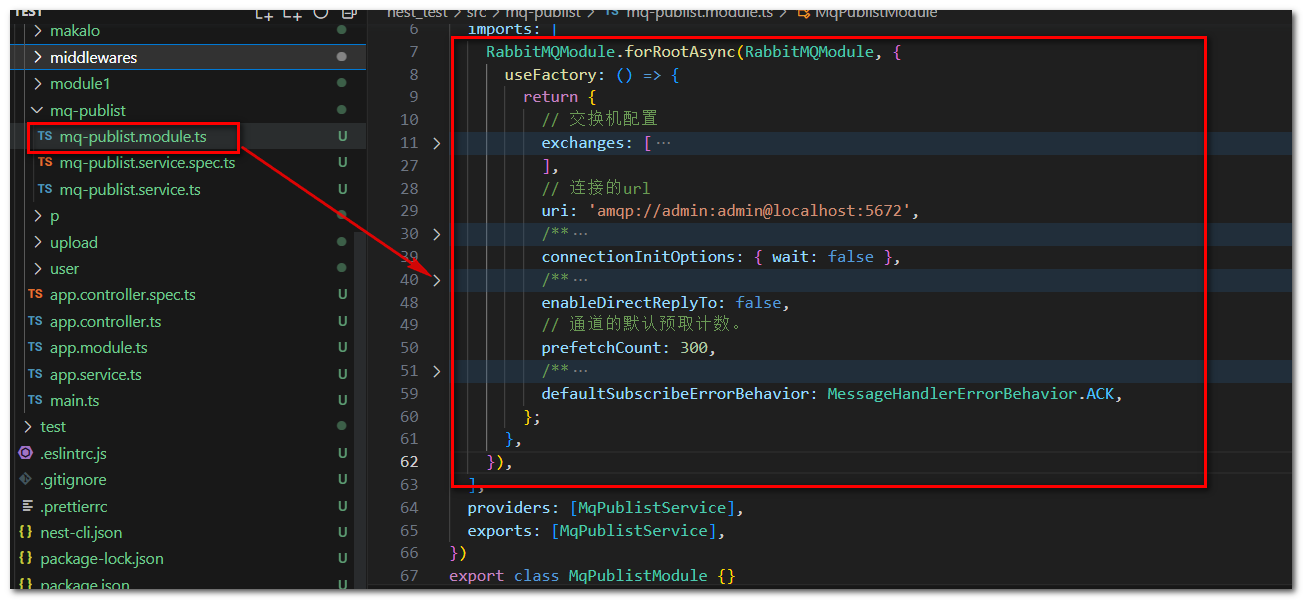
RabbitMQ的exchange、 */ defaultSubscribeErrorBehavior: MessageHandlerErrorBehavior.ACK, }; }, }), ], providers: [MqPublistService], exports: [MqPublistService],})export class MqPublistModule {}
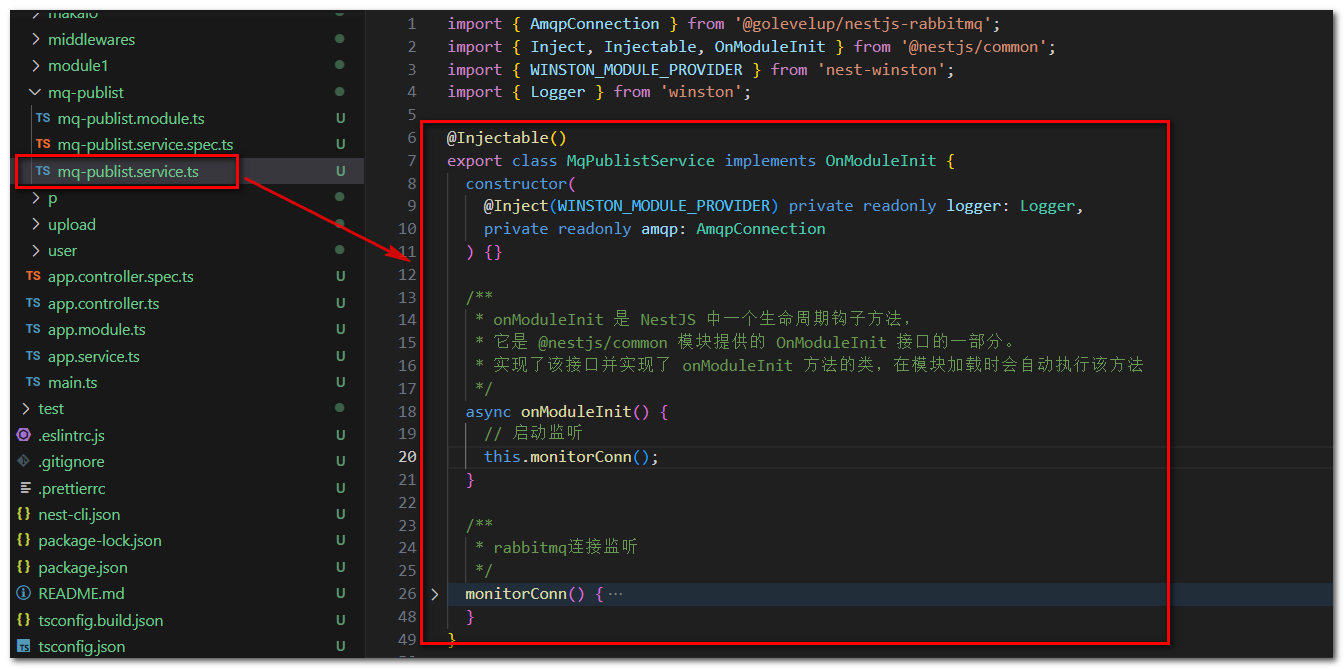
MqPublistService 封装
mq-publist.service.ts
import { AmqpConnection } from '@golevelup/nestjs-rabbitmq';import { Inject, Injectable, OnModuleInit } from '@nestjs/common';import { WINSTON_MODULE_NEST_PROVIDER, WINSTON_MODULE_PROVIDER } from 'nest-winston';import { Logger } from 'winston';@Injectable()export class MqPublistService implements OnModuleInit { constructor( @Inject(WINSTON_MODULE_PROVIDER) private readonly logger: Logger, private readonly amqp: AmqpConnection ) {} /** * onModuleInit 是 NestJS 中一个生命周期钩子方法, * 它是 @nestjs/common 模块提供的 OnModuleInit 接口的一部分。 如果您想要更多的控制权来处理错误,可以将其设置为 MessageHandlerErrorBehavior.NACK,然后手动决定是否重新排队或丢弃该消息。 // 记录时添加时间戳信息 format: winston.format.combine( winston.format.timestamp({ format: 'YYYY-MM-DD HH:mm:ss', }), winston.format.json(), ), }), ], }), ], controllers: [AppController, CatsController], providers: [AppService],})export class AppModule { }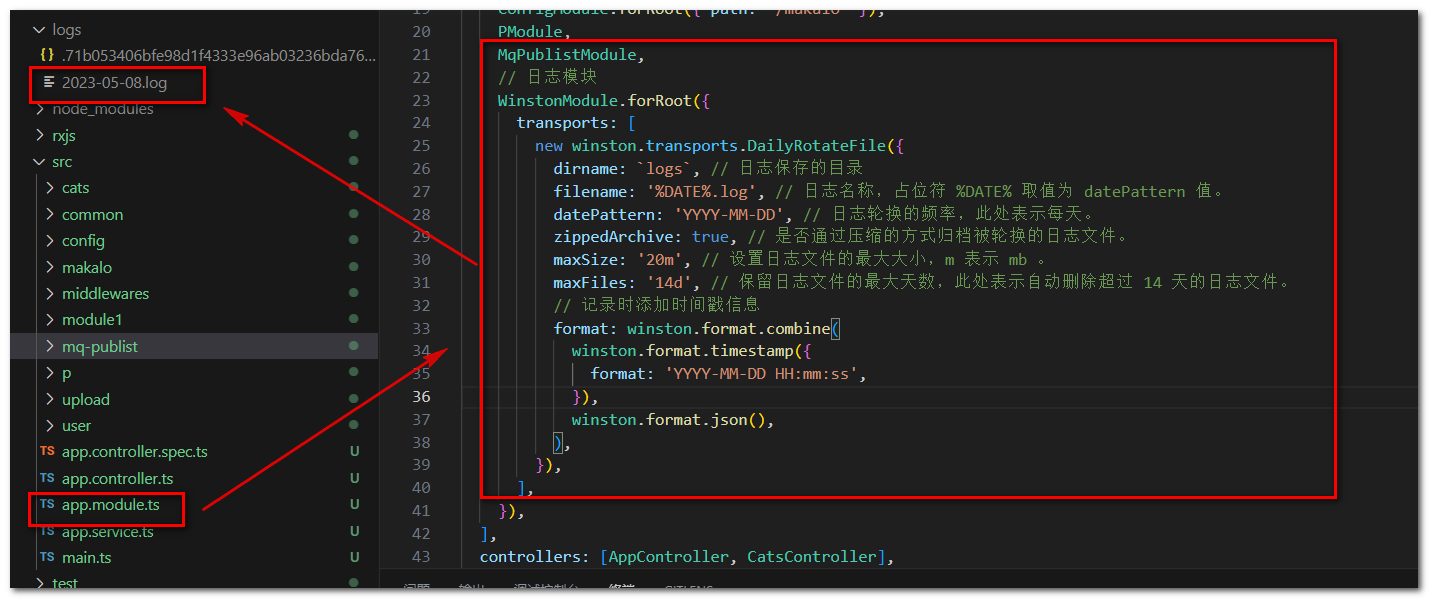
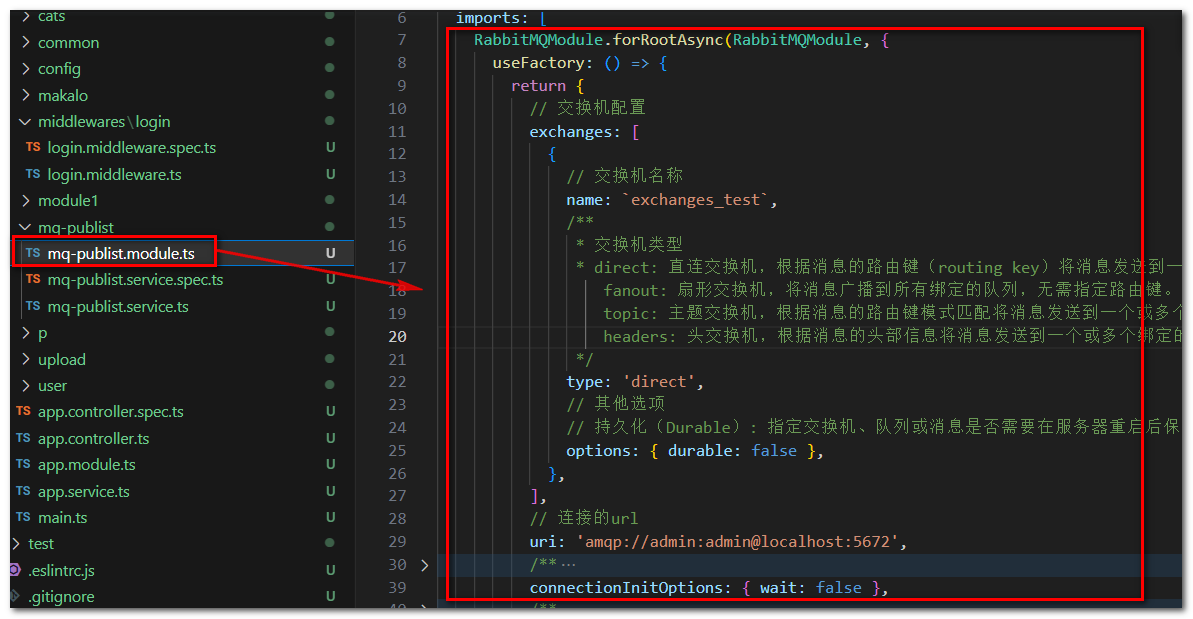
MqPublistModule 模块的RabbitMQ 配置
import { Module } from '@nestjs/common';import { RabbitMQModule, MessageHandlerErrorBehavior } from '@golevelup/nestjs-rabbitmq';import { MqPublistService } from './mq-publist.service';@Module({ imports: [ RabbitMQModule.forRootAsync(RabbitMQModule, { useFactory: () => { return { // 交换机配置 exchanges: [ { // 交换机名称 name: `exchanges_test`, /** * 交换机类型 * direct: 直连交换机,根据消息的路由键(routing key)将消息发送到一个或多个绑定的队列。 maxFiles: '14d', // 保留日志文件的最大天数,此处表示自动删除超过 14 天的日志文件。 当消费者处理消息时出现错误时,可以使用该选项来指定消费者应如何处理这些错误。 timeout: 一个数字,表示连接超时时间(以毫秒为单位)。默认为 true。当设置为 true 时, * 生产者将使用 replyTo 和 correlationId 字段指定的队列和标识符来接收响应, * 而不是使用默认生成的匿名队列。 MessageHandlerErrorBehavior.ACK 表示在发生错误时自动确认消息并从队列中删除 以避免消息反复传递和死信队列的问题。Queue:消息队列载体,每个消息都会被投入到一个或多个队列。这使得消费者可以将响应直接发送到请求者所在的队列, * 从而避免了性能上的开销和消息传递中断的问题。 // 记录时添加时间戳信息 format: winston.format.combine( winston.format.timestamp({ format: 'YYYY-MM-DD HH:mm:ss', }), winston.format.json(), ), }), ], }), ], controllers: [AppController, CatsController], providers: [AppService],})export class AppModule { } 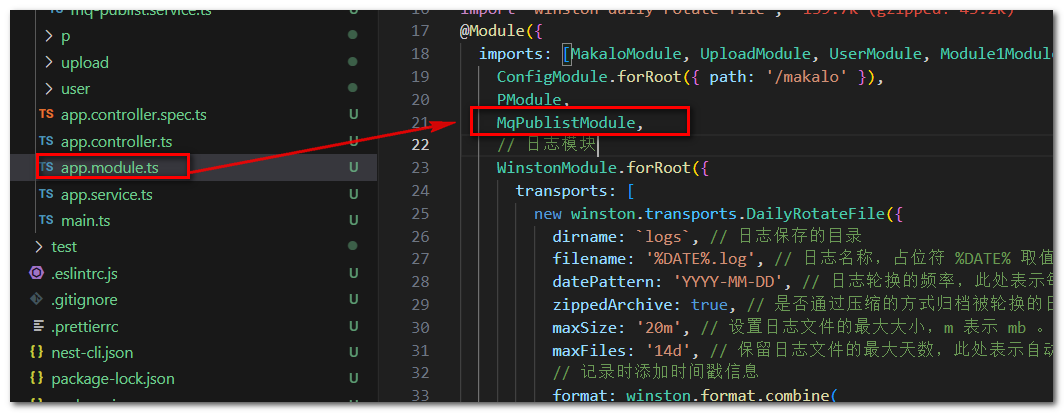
MqPublistModule 模块配置
mq-publist.module.ts
import { Module } from '@nestjs/common';import { RabbitMQModule, MessageHandlerErrorBehavior } from '@golevelup/nestjs-rabbitmq';import { MqPublistService } from './mq-publist.service';@Module({ imports: [ RabbitMQModule.forRootAsync(RabbitMQModule, { useFactory: () => { return { // 交换机配置 exchanges: [ { // 交换机名称 name: `exchanges_test`, /** * 交换机类型 * direct: 直连交换机,根据消息的路由键(routing key)将消息发送到一个或多个绑定的队列。 maxFiles: '14d', // 保留日志文件的最大天数,此处表示自动删除超过 14 天的日志文件。 * 实现了该接口并实现了 onModuleInit 方法的类,在模块加载时会自动执行该方法 */ async onModuleInit() { // 启动监听 this.monitorConn(); } /** * rabbitmq连接监听 */ monitorConn() { const conn = this.amqp.managedConnection; if (conn) { conn.on('connect', () => { this.logger.info('rabbitmq broker connect'); }); conn.on('disconnect', () => { this.logger.error('rabbitmq broker disconnect'); }); } const chan = this.amqp.managedChannel; if (chan) { chan.on('connect', () => { this.logger.info('rabbitmq channel connect'); }); chan.on('error', () => { this.logger.error('rabbitmq channel error'); }); chan.on('close', () => { this.logger.error('rabbitmq channel close'); }); } } // exchange private readonly exc_test = `exchanges_test`; // routingKey private readonly routingKey_test = 'routingKey_test'; /** * rabbitmq发送消息 * @param message */ async pubMQMsgTest(message: any): Promise<void> { await this.amqp.publish(this.exc_test, this.routingKey_test, message); this.logger.info( `amqp publish message -> exchange : ${this.exc_test}, routingKey : ${this.routingKey_test},message : ${JSON.stringify( message, )}`, ); }}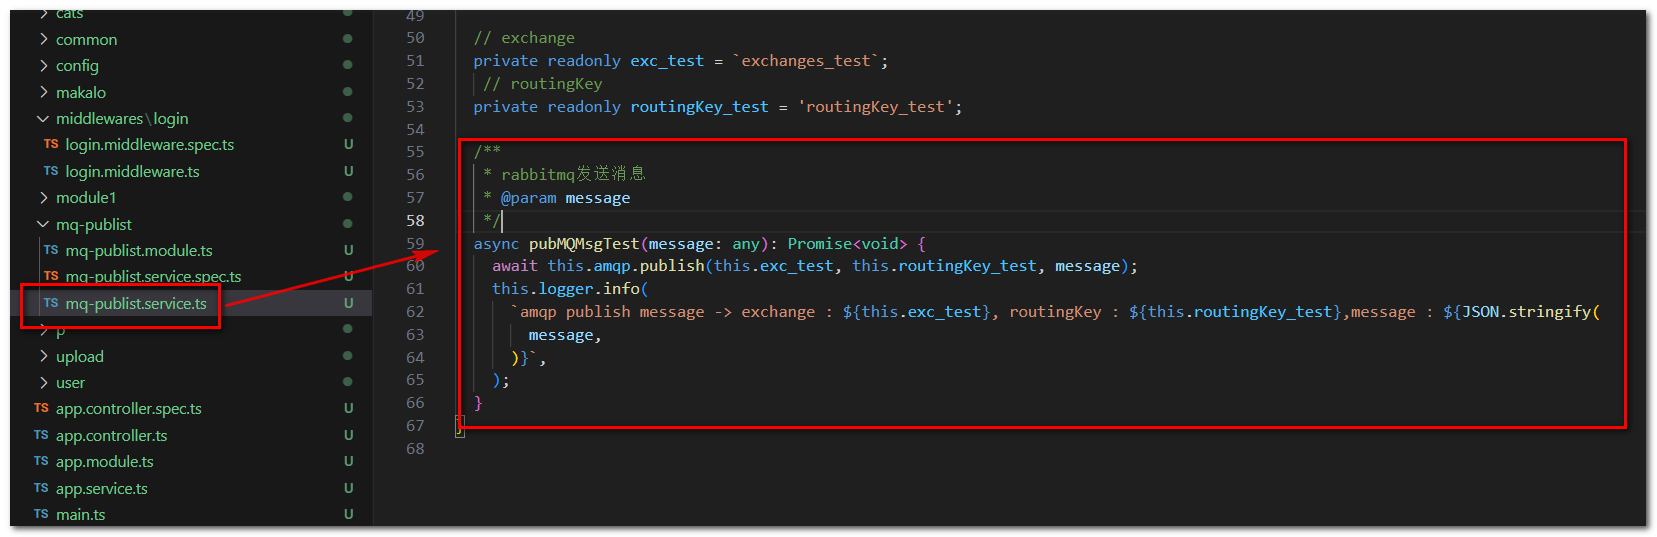
其他模块中使用
import { MqPublistService } from '../mq-publist/mq-publist.service';constructor( private readonly mqPublishService: MqPublistService, ) { }// 发送 RabbitMQ 消息this.mqPublishService.pubMQMsgTest('test send push RabbitMQ');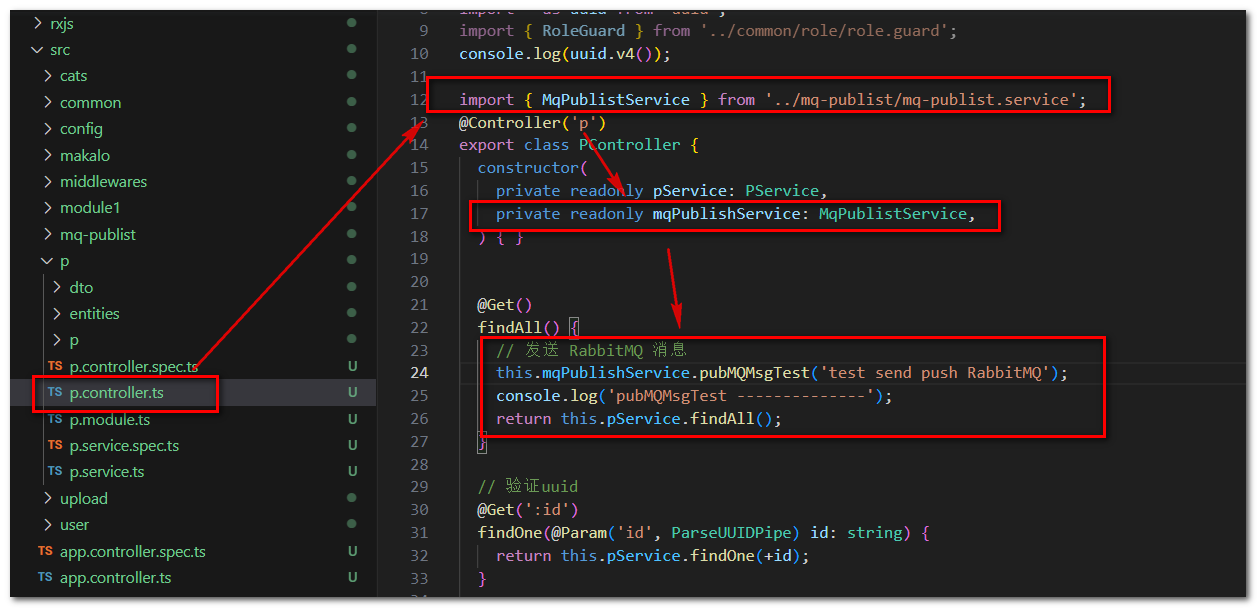
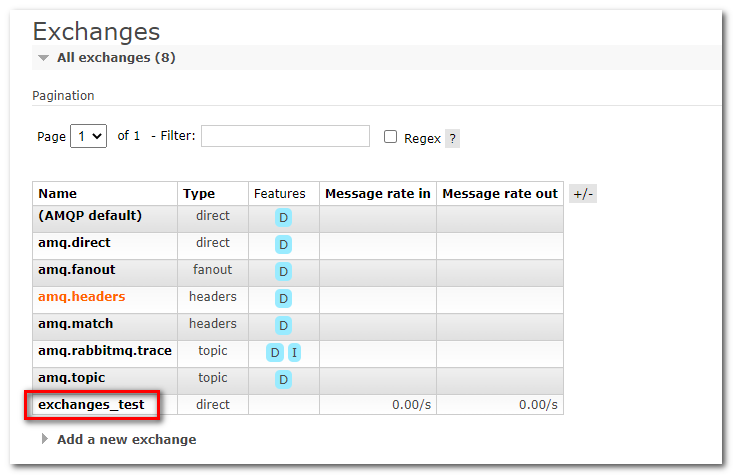
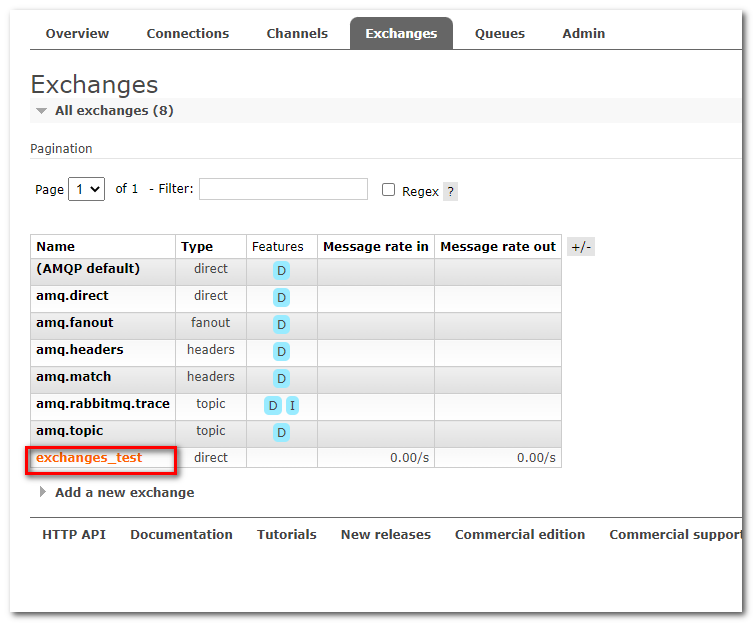
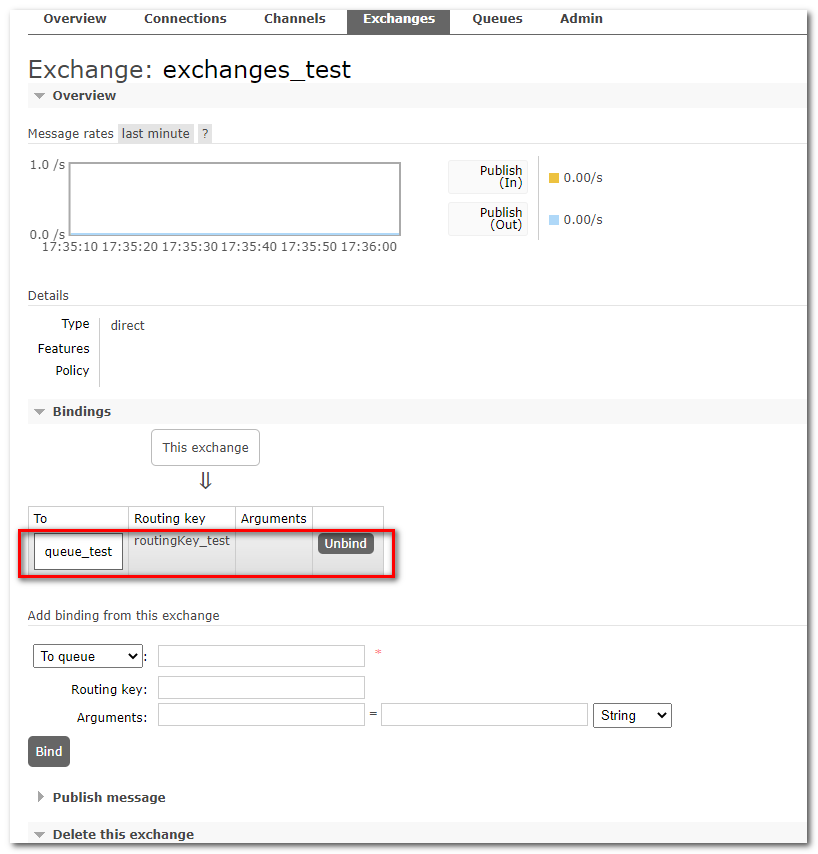
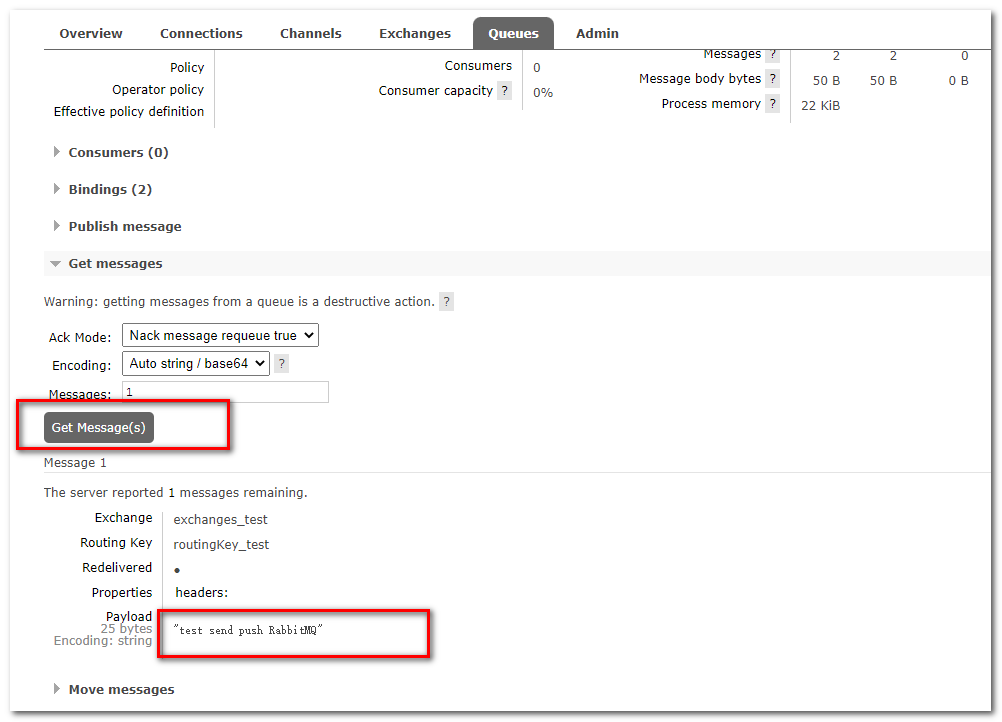
RabbitMQ 管理页面中查看
单击队列名直接跳转到对应的队列
NestJs RabbitMQ 订阅队列消息_案例
nest g mo mqSubscribenest g s mqSubscribe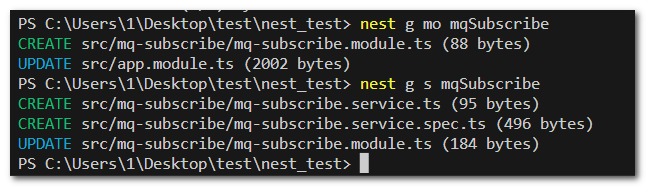
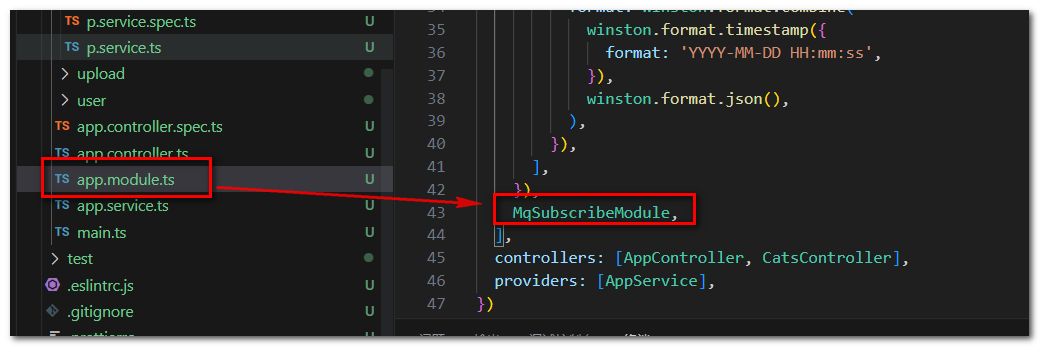
MqSubscribeModule
mq-subscribe.module.ts
import { Module } from '@nestjs/common';import { MqSubscribeService } from './mq-subscribe.service';@Module({ providers: [MqSubscribeService]})export class MqSubscribeModule {}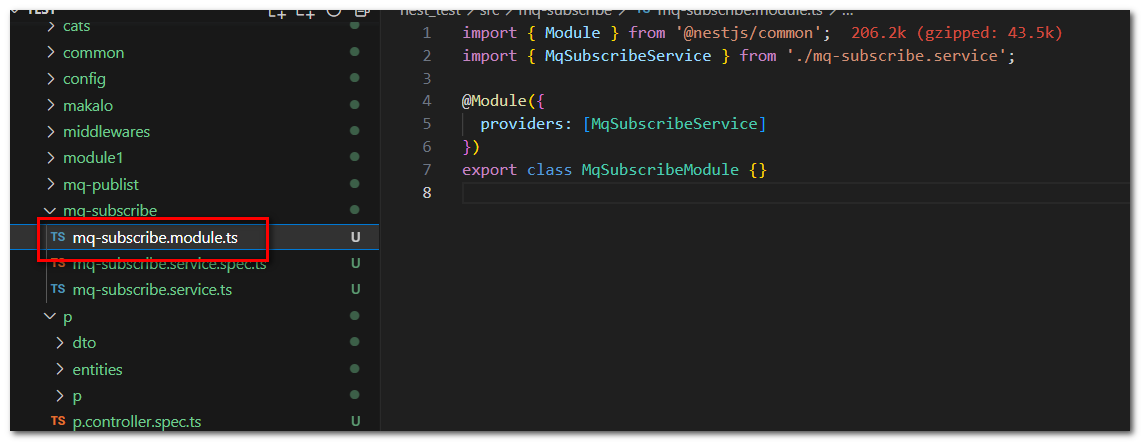
MqSubscribeService
mq-subscribe.service.ts
import { Inject, Injectable } from '@nestjs/common';import { WINSTON_MODULE_PROVIDER } from 'nest-winston';import { RabbitSubscribe } from '@golevelup/nestjs-rabbitmq';import { Logger } from 'winston';@Injectable()export class MqSubscribeService { constructor( @Inject(WINSTON_MODULE_PROVIDER) private readonly logger: Logger, ) { } @RabbitSubscribe({ // 交换机 exchange: `exchanges_test`, routingKey: [ 'routingKey_test', ], // 队列 queue: `queue_test`, // 持久化配置 queueOptions: { durable: true }, }) // 收到队列的订阅消息自动调用该方法 async subscribe(data: any): Promise<any> { const routingKey = arguments[1].fields.routingKey; console.log('arguments[1].fields.exchange :', arguments[1].fields.exchange); console.log('routingKey :', routingKey); console.log('data:', data); this.logger.info( `amqp receive msg,exchange is ${arguments[1].fields.exchange},routingKey is ${routingKey},msg is ${JSON.stringify( data, )}`, ); }}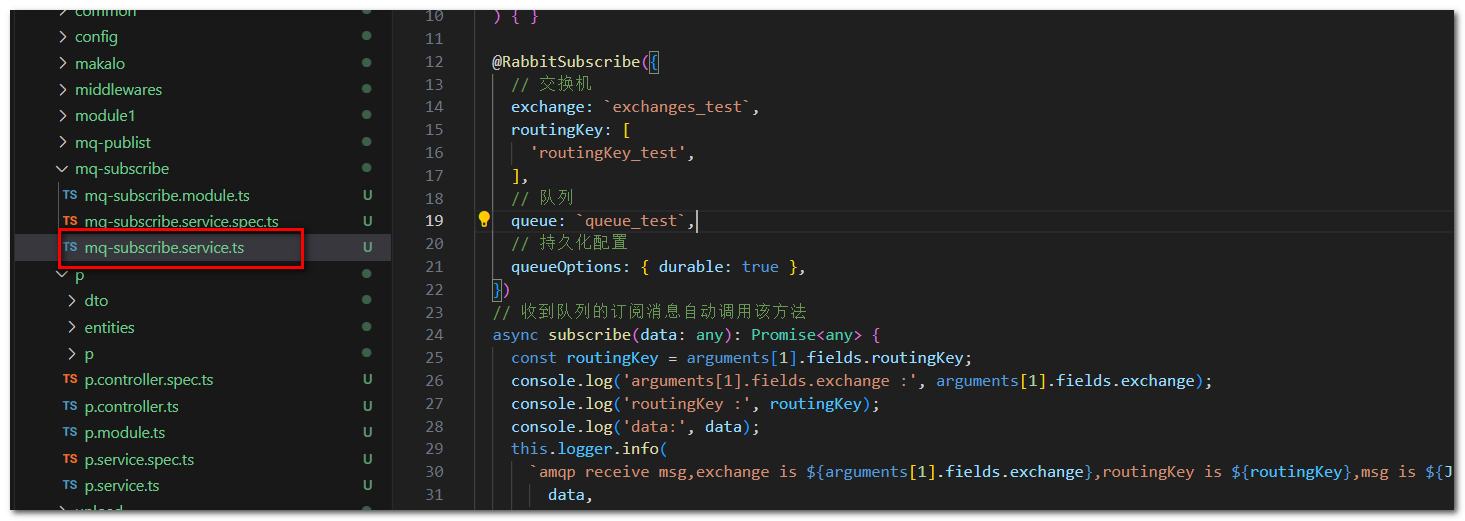
使用上面的发送消息再次访问
http://localhost:3000/p